As requested, here's a tutorial on how I made
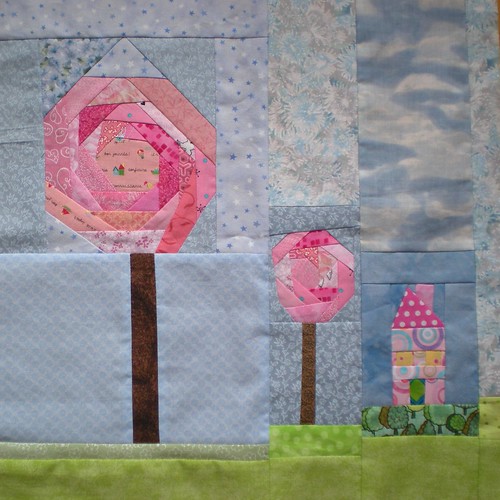
the pieced log cabin style flowers I posted a few weeks ago. First, I'd like to credit where I got the idea. Byneedleandthread made this awesome block for a quilting bee and I was completely taken by it. She mentioned that she did it like a log cabin, so I just tried it out and it worked really well for me. Aren't these trees so cool?!
So here's how to do it with pictures to help along the way.
First cut strips of fabric for the outer rings of the flower/tree. I cut 1.25" strips since I was using some leftover charm squares and that's an easy size to work with.
Cut a shape for the center of the flower. I did both hexagons and pentagons the first time and I like the look of the hexagon centers better, so I cut a hexagon shape. It looks like ByNeedleandThread used a octagon. I didn't worry about it being perfect or anything. I think the improvisational look is what makes these so fun! It's fairly small, but keep in mind that you are going to lose some of its size in the seam allowances.
Take a strip from your pile and pick a side of your shape to add it to and line up the edges. Sew 1/4" seam.
Instead of running to the iron to press each seam, I just finger-pressed each seam towards the outside and then pressed after I went all the way around. If you like to press each seam, go for it!
Grab the next strip and line it up with the next edge of the center shape (I go clockwise around) and trim the tail of the first strip.
If you look closely, you can see I already sewed that last seam before I trimmed. I prefer to do it before because it makes the seams easier to keep straight, but you can do it either way.
Keep adding strips around the center. When you get to last strip, it looks a little crazy and tricky to figure out where to trim:
Flip it over. It makes it easier to trim the other strips so they're not in the way.
After going all the way around the center, press with an iron.
The next step is where I think the fun comes in. In the tree block, you'll notice that ByNeedleandThread kept all of her logs parallel to each other. In the flowers that I did, I liked to rotate the logs a little bit so they had a little more movement to them. Trim your flower how you want it to look for the next round. I haven't done enough of these to have a good sense about what's going to look best, but they seem really forgiving.
Go around your flower just like the first time. I purposely started on a different side than the first time so that the shortest and longest edges are always in the same place. Here's what mine looked like after the second time around.
Two rings of strips looked like it would be enough, so I attached this whole thing to fusible web and trimmed it to a flower looking shape.
When you applique this on, you'll want to make sure to sew around the edge (either with a straight stitch or with zig zag). Because of the seams, not all the fabric is attached to the fusible web. This probably makes more sense once you do it.
I hope this is helpful and if you have questions or are having trouble, I'd be happy to help! Have fun!!


Thanks for this tutorial - I love your flowers and now I can give them a try.
ReplyDeleteThanks for the tutorial. I look forward to trying it!
ReplyDeletecool tutorial!! I love your little flowers.
ReplyDeleteVery cool and thanks for the tutorial :)
ReplyDeleteGood job. This is gonna be a very useful flower technique! Thanks
ReplyDeleteellendacoop@gmail.com
Oh yay! Your tutorial was very clear and I am excited to try it. I'm going to link to you. Hope that's okay!
ReplyDeleteThank you!
this is so fun...it looks so pretty.
ReplyDeleteThanks for the tutorial-I'll have to give this a try
ReplyDeleteThanks for the tutorial! It looks really clear and I'm looking forward to trying out some flowers.
ReplyDeletethank you so much for the tute
ReplyDeleteyour flowers are so impressive!
i cant wait to have a go at them
Thanks for the tutorial! Those little flowers are so fun. I'm going to have to find a reason to make some! :)
ReplyDeleteThis looks great! It would look fantastic on a tote bag, don't you think? I'm definitely putting this on my list.
ReplyDeleteI love these flowers - in fact, I bookmarked your post with them in my "inspiration" folder last week! Thanks for the fabulous tutorial!
ReplyDeleteHi Kris -glad I saw your link on Sunflower Quilts you have a great blog. Love these pieced flowers I'm so into wonky blocks! Awesome fabric choices in your blog header too!
ReplyDeleteIve been surfing log cabin flower variations for weeks and stumbled on this one today. It's my choice for a hand pieced ranunculus quilt. Thanks for sharing your beautiful work!
ReplyDeleteSue Kaufman
Drums PA
ltdoc@epix.net