
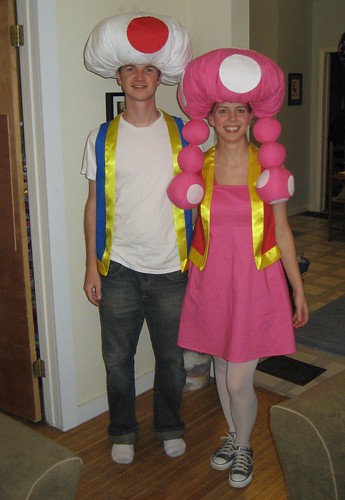
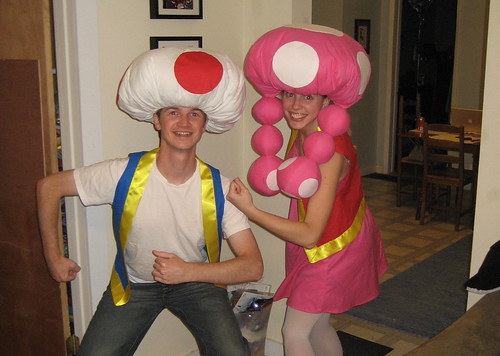
Things have been quiet on the blog lately since I've been busy getting our Halloween costumes done and then having fun wearing them out! Jon and I went as Toad and Toadette from the Mario Kart and Mario Party games and the costumes were really well received and super comfortable!! Jon wore his costume to work on Friday and wore the hat for 8 hours and it was great! I used some of the ideas I originally had, and ended up revising others. Since I had a lot of trouble finding helpful instructions, I'll give you details, but I won't be offended if you just scroll through the photos. If you have questions though, feel free to let me know!

The dress went fairly well considering that I hadn't made one before. I used Simplicity 2485 and extended the bust pattern piece by about an 1.25 inches so it wouldn't be completely inappropriate for my proportions. It worked fairly well but I had some issues working out the placement of the darts since I'm clearly more busty than the model... but in the end I was happy for the experience since I want to be able to make my own dresses and shirts since I have trouble with clothing off the rack. If you use this pattern, I would definitely lengthen it, it worked out fine with shorts underneath, but it is fairly short.
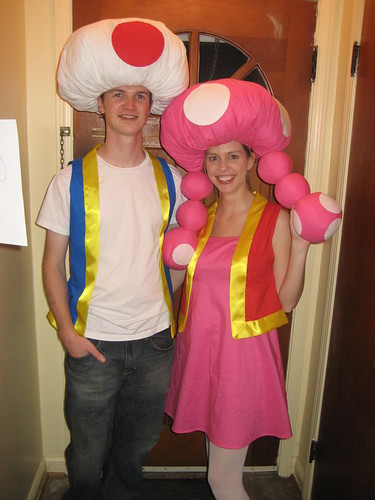
After looking around for a bunch of ideas on how to make Toad and Toadette hats and not finding many I liked, I decided to essentially make big pillows. I wished they had been smooth but this ended up being so easy for me, that I can't really complain. I made a hat using the pattern that came with the dress as a base (a store bought bucket hat would also probably work). I elongated the pieces so that the hat would be less of a beanie. To make the top, I cut a big circle (about 36" diameter) and basted around the edge. I pulled the threads on one side to gather the top, attached it to the hat and turned it right side out before stuffing it with polyfil. The circles are appliqued on my hand using Naptime Quilter's awesome circle technique since I didn't want to iron on over the gathered ripples.
For the pigtails I use the tutorial for cloth balls from Grand Revival. I used the biggest and smallest sizes. I was actually able to use fusible web to iron on the dots to the pigtails. I had no idea that would work as well as it did since I couldn't really press hard since the pigtails were basically pillows.

The vests were done by tracing the back of a t-shirt and cutting 2 of them. I cut one of those in half and sewed it together at the shoulders. I did the rest of the fitting by trying it on and eyeballing how to get it to look right. My vest has darts coming from the arm holes. The trim is satin blanket trim that I bought in a little package. I really didn't like working with it since it was really slippery and didn't have any give at all. You can't see it in the picture, but the trim actually gathers a bit behind the neck. If I were to do it again, I would use bias tape.
P.S. If you're looking for other ideas to make these hats, popular ideas seem to include
- paper mache (which is really heavy)
- sombrero with bubble wrap and fabric over the top
- half inflated beach ball with fabric over the top
- egg crate foam to create structure inside the hat


Cute!
ReplyDeleteVery cute.
And you have a beautiful smile.
=-)
Super cute! Looks like they were a lot of fun to wear!
ReplyDeleteYou both look awesome!
ReplyDeletePlanning for extra length in the bust area was super smart... I swear, it was years before I figured that out. :P Should you decide to try more dressmaking, the adjustment is called a Full-Bust Adjustment (FBA)-- and there are lots of great tutorials on the interwebs that can help you to really refine the fit!
Wow, what fantastic costumes!
ReplyDeletethese are really cute costumes!
ReplyDeleteThose are amazing costumes!! You really did a fabulous job on them! ~ Jennie
ReplyDeleteAMAZING costumes - you are one talented chica!! Looks like a ton of fun!!
ReplyDeleteThat's hysterical!
ReplyDeleteThis comment has been removed by a blog administrator.
ReplyDeleteCute costumes! Thanks for posting this tutorial! I've searched online for instructions on making a Toad hat, but I hadn't found a tutorial I liked. Thank you for sharing your ideas. I may try adding darts/pleats (I'm not sure what you'd call them if they're on a hat) at the bottom of the hat to cut out some of the gathered fabric. Or maybe not - your hats are super cute just as they are. :)
ReplyDeleteThis comment has been removed by a blog administrator.
ReplyDeleteI'm back with a follow up...I made my son's costume. Your hat suggestions were very helpful. HUGE thanks! I'll be posting a tutorial (hopefully I'll get around to it) and will be sure to link back to you, giving you credit for helping me understand the structure of the hat. Happy Halloween!
ReplyDeletehttp://what-rachel-made-today.blogspot.com/2010/10/sneak-peek-toad.html
Hi
ReplyDeleteI love your costume. I am hoping to be toadette this halloween
I was wondering if I could possibly buy the hat? or if you could possibly make one for me at a price?
If you could, my email is ffrootloops@gmail.com
Thanks and Regards,
Where did you get these costumes?! Amazing!
ReplyDeleteI made them! Thanks for the compliment!
DeleteHey! BEST TOAD AND TOADETTE COSTUMES EVER!!!!!!!!!!!!!! My daughter's school was doing a Super Mario play and I was on costume patrol(NEVER SIGN UP FOR COSTUME PATROL, EVER!!!) And so, The original toad costume was blue plaid bermuda shorts, a polo shirt, and a vest that matches the shorts. the same with toadette except she had a skirt not shorts and it was pink not blue. But, your costume tutorial was soooooooo much easier and the costume was easier to make! also, less expensive.
ReplyDeletethanks again!
Well my 6 year old has fallen in love with your toadette costume. So I know what I will be doing in the next few weeks. Thanks for posting the instructions, I am much less intimidated by the task at hand!!
ReplyDeleteLove it! Can't wait to make it for my 10 year old for this halloween.
ReplyDeleteA question about the hat: what do you mean by you used the hat that came with the dress pattern? I looked up the pattern for the dress and didn't see a hat.... would a skull cap work? Thanks for your ideas
A skull cap would work, or I think a bucket hat that fit well would be even better since it's not a knit fabric. The hat I made was for a little beanie hat that came with the pattern I bought. Happy sewing and let me know if I can help in another way!
Delete